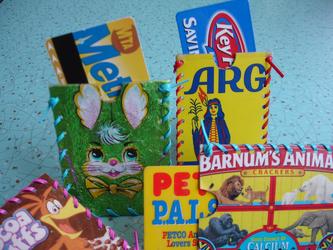
Our project is a Metro Card Cozy, (great for credit cards and business cards too!), made from recycled cardboard packaging. First we used a template to cut out 2 pieces of cardboard for the case, (Tony the Tiger, Coco Puffs, the lovely Land O' Lakes Lady, postcards from Dollywood, whatever suits your fancy!). Then we laminated the pieces with clear contact paper, hole punched the edges, and stitched them together using colorful plastic lacing, (also known as lanyard, gimp, and our personal favorite boondoggle!) Voila! You have yourself a cute and durable card cozy. This craft would be great as a stocking stuffer and came to a grand total of about 33 cents!
For the serious crafter only, here's a little how to:
1. Dig like a little badger through your recycling bin for some attractive cardboard packaging.
2. Make a template for the card cozy which is about 1/4" wider than a Metro Card on each side, and cut out a small semi circle at the top edge , (this makes it easier to get your card in and out). If you can, make the template out of clear plastic so you can see where it falls on the cardboard, (use a plastic sheet protector or a heavier plastic if you have it). No worries if you don’t have any plastic, just use some plain cardboard to make the template.
3. Choose what part of the cardboard package you like best, put the template in place, then trace and cut out your piece. You will do this step twice so you have 2 pieces total for the front and back.
4. Cut out 2 pieces of clear contact paper a little over twice the length of your template and about 1/2" wider. Coat each of your 2 card cozy pieces separately with the contact paper. The easiest way to do this is to lay your cardboard piece face down on top of the contact paper (sticky side up), with the bottom edge of the cardboard just above the bottom edge of the contact paper. Then wrap the contact paper over the top edge and coat the back of your cardboard piece. Trim away the excess including the semi-circle on the top edge.
5. Use an 1/8" hole punch to make holes along the 2 sides and bottom of your card holder pieces. The holes should be just in from the edge and about 1/4" apart from each other. It's hard to do both pieces at once, so the easiest thing to do is complete one piece, then paper clip your pieces together (finished side on top), and use the top side as a guide to punch through to your bottom piece. This ensures that your holes line up.
6. Finally, Attach your 2 pieces together with plastic lacing. Start with a knot at the top corner, then lace around the edges, ending with a knot at the end. Finito!
submitted by: Brooklyn Craft Farm
www.brooklyncraftfarm.com
Leave a Comment
Email addresses are required but never displayed.